Yes, all of you Blood Bowl fans out there should know the Impact Miniatures line pretty well. For the past decade or so, they’ve been doing more for Blood Bowl than Games Workshop, and by quite a long shot.
They do have their own game (called Elfball) which they support pretty well, but they also have no qualms about doing a little bit of everything.
They’ve just unveiled the beginnings of a new elven team: the Timberline elves. So far, they’re looking pretty good. Sculpted by Patrick Keith, I think these go to show just how much he’s been improving. I can’t wait to see the rest of the team show up.
I have to say, I’ve been very impressed by the way that Fantasy Flight has treated their license to create Warhammer 40,000 role playing games.
From the brilliant artwork and the tone of each of the books, you really do get a strong feel for the rich universe of 40k- and it is honestly more rich and worked out in the RPG books than it is in most of the 40k force books.
One interesting note, though, is that there isn’t exactly a line of Dark Heresy or Rogue Trader minis. Deathwatch has plenty, since marines are the iconic centerpiece of 40k, but there are so few women, and even fewer non-military humans that finding good minis for a 40k RPG often takes you outside the line.
Dark Age has a good line of minis in trenchcoats, and a lot of them would work brilliantly as Rogue Trader characters. Another place to look is Reaper’s Chronoscope line, where pretty much anything goes.
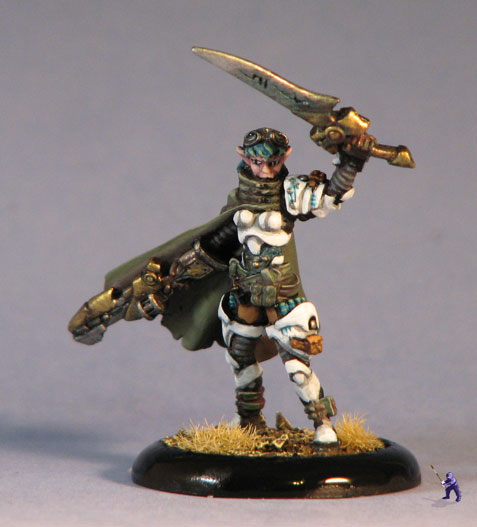
Here is a character I painted for a Rogue Trader campaign. She originally came from Anima Tactics, but she has so much character that she was just screaming to be role played:
The guys over at Project Good have been working on a miniatures game system that incorporates every miniature you could possibly own.
It would seem that your two foot tall Vizeralyn the Oracle Dragon mini can go up against your Epic 40,000 imperial guardsmen. According to the rulebook, you can even use rocks or fruit if you are sad and don’t have minis.
Anyway, as part of their beta testing, they put the full rulebook up online for you to download. You can play and give them feedback to help them create a better game, or you can just play.
When I first started painting miniatures, I had a hard time with color recipes. Early on, I found an issue of White Dwarf with some of the old ‘Eavy Metal tutorials in it (mostly from Mike McVey). It was a huge help, and got my painting on track, but it also limited me quite a bit.
For example, I found a tutorial that gave me the color recipe for Khorne Red armor (a dark red, highlighted to a lighter red and then an orange). Well, that was my red, and it was my only red for quite a while.
I’ve come a long way since then, and I’m quite a bit beyond making my own recipes. One of the things I’ve learned is that you don’t always need to stick to even similar colors when you’re shading and highlighting.
For example:
This mini has quite a bit of different shading to her. Although the white armor was done pretty strait forwardly (it has just a little bit of blue in its shading) the rest of the mini was shaded in a dark magenta.
You can see it a little in her face, her green belt or on her grey sleeves, but there’s just a bit of a dark magenta beneath those colors. The red creates an interesting warm pallet even with colors that are not normally very warm.
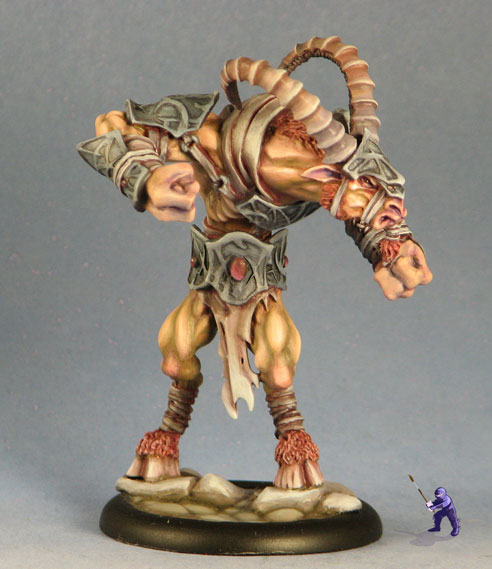
Here’s a more extreme example:
I used a fairly standard human flesh tone for this Satyr’s skin, but I shaded it with several different colors. Parts of him are shaded with green, parts are shaded with purple, and other parts with red.
It is also easy to see the red shading in the loin cloth color, which is highlighted up to a light blue-grey color.
The highlighting has the same variety to it. Some parts are highlighted with lighter flesh tones, but some are highlighted in blue.
Actual objects in nature often have coloring this dynamic to them. For example, the coloring we see on a face is going to be a combination of pigments, blood and anatomy under the surface and the light- both from your lightbulb and a little coming in the window. All of these things are different colors, and there’s a lot of complexity to it.
Go ahead and experiment to see what happens when you shade your red with a green or if you highlight your grey with a pink, or if you shade your ork’s flesh with a red color. You may find you like the results.
Just a little while ago, I got a nice commission to paint an Eldar Avatar. I’ve painted a few different Avatars over time, this one is based a little more on the studio color scheme than previous ones that I’ve done.
The trouble with the Avatar mini is that he can very easily become too gaudy. His lower body really demands a lava glow effect while his upper body is adorned with all kinds of ornaments and detailed armor plates. If you choose a too bright color for the mane or tabard, it can get out of control.
For this mini, I used a darker color on his mane, and balanced the white tabard with a white rune on the Avatar’s head. Overall, I think it has worked pretty well, without really deviating from the studio scheme.
A little while ago I received a commission to convert and paint some themed chimeras for a Praetorian Imperial Guard force.
One was meant to be the chimera for an Ogryn unit. This one shows battle damage from the inside, since the Ogryn, it seems, are afraid of the dark. You can't see it quite as well from this photo, but the back door also shows signs of abuse:
The second chimera is for the psyker squad. Rather than show the extra battle damage, this chimera is covered with scrolls, purity seals, rune plates, a few books and even a couple of eyes.
I'm still not sure if those embellishments are meant to protect the psykers from warp energies, or if they're there to protect the rest of the guardsmen from the psykers.
Object source lighting (normally called OSL) is a pretty impressive technique that isn't too difficult to pull off. With OSL technique, you are trying to create the illusion that the mini is actually being lit by something on the mini rather than being lit from above. While there are several ways to do a strong OSL mini, each one gives you a different kind of light interplay.
The most straight forward OSL type is the strong, colored light. With this technique, you are trying to simulate a mini that is surrounded by darkness, with only one source of light- and that light source creates all of the color on your mini.
You need very few colors for this type of mini, and you will essentially be painting your mini in greyscale. It is sometimes best to only use two colors on a mini like this (black and the light's color). However, I prefer to use at least three colors (black, white and the color of the light) . That way, it is easy to have a very saturated color of the light without making the mini itself seem too dark.
Your color for your light source should be the lightest thing on the mini (I generally use a mix that is close to white- even for colored lights). The base coat for everything else is black.
After that, you need to highlight up toward the source of the light. For this, think of light as a particle rather than a wave. It only travels in straight lines, so take a straight tool (your brush will work) and try to draw straight lines from your light source to other parts of the mini. If you can't get a straight, unobstructed line from the light source to a certain spot on the mini, then that spot is in the shadow.
From there, the highlighting technique isn't very different from normal highlighting except that rather than highlighting towards the top of the mini (representing light from above) you are highlighting towards the source of your light. It sometimes helps to turn the mini sideways with the light source at the top so that highlighting in this way can feel more natural. Make sure that your highlights get lighter as they approach the source of the light.
When highlighting, you'll want to make sure that nothing is as light as your light source. That is an important part of the illusion you're creating. The source of light has to be lighter than the things that it is lighting, or else the eye won't be fooled into thinking that he's looking at an actual light source.
After you've done the more simple version of this with fewer colors, you might want to try out the same technique with more color. Try adding some color to the base colors on the mini (so that the flesh, metal and cloth are all a little different in color. You'll notice I did a little of this with the infernal above (his face has just a hint of purple to it).
But with the diorama below, I used quite a few different colors, and several sources of light (including moonlight coming from outside of the mini). The armor, flesh, cloth, rock and the hydra all have different base colors that were mixed into the highlighting (and all of them were highlighted toward the yellow light from the candles.
Also, since I used multiple sources of light on this mini, you'll notice quite a bit of different shadow interplay. It looks far more complicated than it is- I still used simple straight lines starting at the source of the light and highlights that got lighter as they approached the light source.
Overall, this is a technique that looks far more difficult than it is. Don't be too intimidated to try it out, you may find you're very pleased with the results.
Ok, so this is one of those commissions that I have to share. A client of mine created one of the coolest reposes for the Dire Troll Mauler that I've ever seen, and had me paint it up for him.
The colors are based on an example mini that he painted (there was a little room for interpretation). Overall, I thought this mini was a fantastic one to paint.
Just to make sure I'm giving credit where credit is due, I did not convert this mini, my client did. I only did a little bit of green stuff work in small places.
Welcome to Garden Ninja Studios, the source for your miniature painting and sculpting needs. We are currently accepting commissions. Please check out our forum and gallery and email us about your project. Watch here for photos of our recent studio projects, links to painting tutorials and other cool stuff.